Using PodGrab & Docker to backup my favorite podcasts (In this case on a QNAP NAS)
Whilst it’s not a certainty that data will removed from the web, it does happen (See /r/datahoarder and /r/lostmedia). As I get all my podcasts through Spotify these days I have no control if they suddenly pull their account, or stop the show. There are also other use cases, like wanting the offline MP3 to add to another device if you will not have any connectivity. As there are some I enjoy and can see myself listening to again in the future, why not catalog them!
In this post, I am using PodGrab in a docker container, running on my QNAP NAS. The container runs in the background and checks provided RSS feeds periodically. It will download any new episodes it finds, as well as any existing ones to a mounted directory.
Note: This guide is in the context of using ContainerStation on a QNAP NAS Device (As these are basically notes to future self on how I set this up!) You can still use this container on a regular docker instance using docker run
Setting up in Docker and not on a QNAP
This guide is focused on the QNAP side so this isn’t the article for you, but otherwise simply run the docker command below or see the official git repo for notes on docker-compose.
docker run -d -p 8080:8080 --name=podgrab -v "/host/path/to/assets:/assets" -v "/host/path/to/config:/config" akhilrex/podgrab
Setting up on the QNAP NAS
Whilst its not a requirement, I recommend setting up a new user for docker to run under which only has access to a new shared folder where you will store the podcasts. This allows the container to be more isolated, and whilst you can run as the admin/root user, this allows the container carte-blanche access to your system.
Create a new share (optional…) and create a location to store the podcasts.
Create a new share, or pick one that you will use. In my example I simply re-use my “Media” share.
Then make a new folder which will contain the downloaded data. You will need 2 folders – “Assets”, and “Config”. How mine is set up is shown below.

Create a new user
In the control panel, select Users -> Create.
Give the user a memorable username (we will need it later) and under “Shared folder permission”, select “RW” permission on the share you will be storing the data in.

Next we need to get the users ID to pass through to Docker. We need to SSH to the server. For this I am using PuTTY (choco install putty or find online). Provide the NAS IP address or name, and leave the port. Press “Open” and you should get a new terminal window.

When prompted, log in to the system as an admin user.

If successful you will get to the somewhat helpful “GUI”. Press “Q” to exit this though, as we just want raw terminal! – Following the “yes i am sure i want to quit” prompts.

When you get to the terminal, run id <username> command to get the IDs for the user you just created. (UID and GID)

Running PodGrab on ContainerStation
Go to ContainerStation within the QNAP dashboard, then “Images”, then select “Pull”.
In the modal dialog, select the Docker Hub registry, provide the image name of akhilrex/podgrab and leave the version as latest. Press “Pull”.

Select “Create container” on the new image.

On the next screen, give it a unique name and set any CPU and RAM limitations (It ran more than fine with 256mb, and can probably do even less!). Then select “Advanced Settings”, “Environment”, and change the “UID” to the UID from the PuTTY window previously. This will limit the container to the permission of the new user.
Next, we need to map the volume. Go to “Shared Folder” under advanced settings and under “Volume From Host” we need to map 2 directories for PodGrab. Here we select the Location we want the podcasts to be stored to (/Assets) and the place the config will be stored (/Config). Technically you don’t need to map them and can use docker volumes, but this way the data is actually accessible from outside the container.

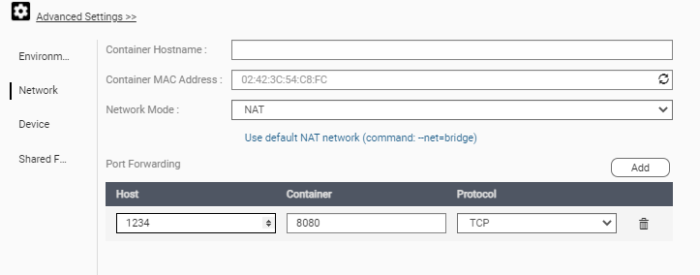
Finally, lets forward the port. Select “network” and then add a port which will be used to access the GUI. For example in the screenshot below specifying 1234 will make it accessible at http://NAS:1234
Click create and wait. You should see the new container running under the “overview” tab of ContainerStation.
Setting up PodGrab
It’s quite self-explanatory really, but visit http://nas:port (as configured above) now and you should see PodGrab.
Simply add a new show using the on-screen prompt from RSS feed and it will display on the home page. You can leave it and have it grab everything from this point onward, or click “download all” to get all available ones up front too.
Below is showing the screen, with 2 of my favorite podcasts.

Checking your mapped directory should show you the MP3s under the Assets folder.
Bonus round
What is also nice about PodGrab is that you can listen to the podcast via the web interface too, on any device on your network. Simply navigate into the show and select an episode which has been downloaded and use the in-built player.